FAQ: Designing Albums

I'm a newbie when it comes to album design. I just recently started using Madera as my album company and The Bobbi Shop templates to design albums, so please know that this is just what's worked for me ... there are LOTS of options out there. If you have a good one, I'd love to hear about it! Why did I decide to pay for my album design templates when there are lots of free options? Quite honestly, I love Bobbi + Mike's work and knew that their products would be topnotch. And guess what? I was right! Before I committed, I tried the free trial. Considering I wasn't a veteran to album design, this was crucial.

If you decide to use b+m's templates, know you'll be using InDesign. I was NOT familiar with InDesign before I started but that's OK because Bobbi walks you through everything with a really in-depth tutorial. It's a little overwhelming at first, but a lot of the tutorial is practicing over and over so it starts to sink in.

Photography album templates

Another reason I decided to go with this album design option is because I had heard that they were SUPER quick and easy. I've heard lots of photographers talk about how time-consuming album design is and I didn't want to get stuck there right off the bat. Plus, Bobbi boasts that her templates are "the most ridiculously amazing get-your-life-back album design templates ever." How's that for tempting?

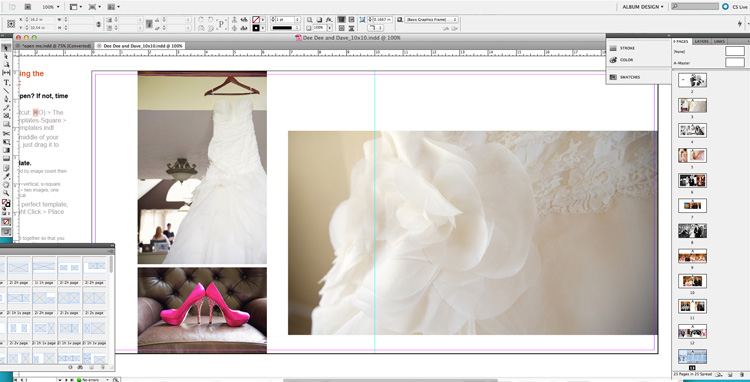
And after using the templates I have to say that they are pretty quick. See that box up there in the bottom left-hand corner? Those are your album pages options, and while there are a lot of them, once you decide on a design it's amazingly fast to stick your pictures in there and be DONE. No finagling the size, placement, etc. It's set!

Here's a look at some actual page spreads I'm designing, featuring the lovely Dee Dee and Dave. Soon I will show you the finished product!

Photography album design Photography album design Photography album design

I'd love to hear feedback on your album design experiences. What works for you? What doesn't?

FAQ: Creating a Wedding Timeline

One of the hardest things we had to do when planning our wedding was to figure out the flow of the day. And I had worked with a wedding photographer for two years! I can't imagine trying to tackle the schedule with no idea where to start. While often times planners and even caterers help with the day's flow, my couples don't always have planners, and even if they do, I am more than happy to give my insight into the schedule, especially as it relates to photography. I never strive to be the sole schedule-maker, but I have found that brides (much like myself almost one year ago) have no idea what to expect and want assistance, even if it's just to point them in the right direction.

About a month and a half before a wedding, I e-mail my couples the following things:

  • A must-take shots list
  • A vendors list
  • My "Get to Know You" form (which helps me fill in the details on their wedding blog post)
  • A request for a rough draft of their schedule or the pieces that need to be placed into a schedule

(More on those top three bullets later.) Once I receive a rough draft schedule or, more likely, questions about the schedule, I give suggestions on time frames, help pad times, and/or give the couple an idea of where things should fit into the day.

Here are two sample schedules that have worked well for 1) couples who choose to see each other before the ceremony (otherwise known as a first look) and 2) couples who choose to wait until the ceremony to see each other. These options look very different photography-wise because, obviously, portrait time is affected by when the couple will see each other. Let's say the ceremony time is set for 4:30 p.m. (you can adjust based on your set times): First Look Timeline Noon—Getting ready photos + detail shots 1:15 p.m.—Bride gets the dress on 2 p.m.—First look; bride and groom portraits 3 p.m.—Wedding party photos* 3:30 p.m.—Family photos* 4 p.m.—Photos finished; bride and groom relax in respective rooms at ceremony location 4:30 p.m.—Ceremony 5 p.m.—Cocktail hour and/or reception (this is when I get reception detail shots) 5:30 p.m.(ish)—Wedding party announced into reception 5:45 p.m.—First dance(s) 6 p.m.—Dinner 6:15 p.m.—Toasts (usually during salad course) 7 p.m.—Cake cutting and/or dancing begins 8 p.m.—Maaaybe sneak a couple more photos of bride and groom! Shoot candids and dancing!

Traditional Timeline 2 p.m.— Getting ready photos + detail shots 3:15 p.m.—Bride gets the dress on 4 p.m.—Bride and groom relax in respective rooms at ceremony location 4:30 p.m.—Ceremony 5 p.m.—Family photos 5:30 p.m.—Bride and groom portraits and wedding party photos 6:45 p.m.—Wedding party announced into reception (if at all possible, I try to sneak in first for detail shots) 7 p.m.—First dance(s) 7:15 p.m.—Dinner 7:30 p.m.—Toasts (usually during salad course) 8:15 p.m.—Cake cutting and/or dancing begins 9 p.m.—Maaaybe sneak a couple more photos of bride and groom! Shoot candids and dancing!

*I usually suggest that the wedding party and family members are told to arrive 15 minutes earlier than the scheduled time. Traffic happens, wardrobe malfunctions happen ... it's always best to give yourself a few extra minutes so you can roll with the punches.

I'm all about being creative with your timeline too! But I hope this helps you soon-to-be-brides get started.

Creating a Wedding Timeline

FAQ: Getting Your Professional Photos Printed

A little game of Mad Libs: They're here! They're here! You got your disc of [wedding, engagement, newborn, family] photos and you [take, upload] them to the [nearest, easiest, most advertised] photo printing [store, website]. You finally get those gorgeous prints and ... wait. Why is my [head, arm, bracelet, flowers, feet] cut off in the photo? It didn't look that way on the disc.

Lots of photographers heavily encourage, or even require, that their clients get prints through their chosen printer. And there's a reason for that. While I'm pretty laid back and understand that I'm giving my clients a disc of photos to ultimately do with it what they will, I do recommend that they get those pretty prints done through my printer or a couple other vetted options. Here's why ...

My Canon 5D Mark ii shoots at a ratio of 3:2. Do the math and it converts to a 6x4—or 4x6—photo printed perfectly.

Professional Photo CroppingHere's my faaaavorite photo from Nicole and Chris' wedding. It's at a 3:2 ratio.

Unfortunately, not all print sizes fit into that ratio as perfectly as a 4x6, and I don't know about you, but I want to get big, dramatic photos printed at all kinds of crazy sizes. This means that I have to physically crop the photo to the size I want. 8x10? A 4:5 ratio. 20x28? A 5:7 ratio. Make sense?

Professional Photo CroppingHere's that same photo at a 7:5 (or 5:7) ratio. Compare to the photo above to see what's missing. In this case, it's a pretty good crop.

Professional Photo CroppingAnd here it is at 5:4 (or 4:5 ... an 8x10).

Color rendering and other quirks aside, the easiest and most advertised printers don't allow you to choose the crop. That means if you choose a ratio other than 3:2, you'll get your photos back looking differently than they do on the disc. And in some cases it might not be a good different.

If you have the luxury, get your prints done through your photographer's printer to ensure the absolute best quality. If that's not an option for you, consider using a company like www.mpix.com that at least allows you to choose your crop.

I hope that helps someone out there! :) If you have other questions, I'd love to answer them. Feel free to leave them in the comments section down there.